We’re going to explore how you can create your own efficient watering system that delivers water directly to your plants’ roots, making gardening a breeze even during those hot summer months.
By the end of this article, you’ll have the knowledge you need to set up a custom irrigation system tailored to your garden’s unique needs.
Key Takeaways
- Create a watering system that reduces water waste
- Learn how to set up a DIY irrigation system for your garden
- Discover the benefits of delivering water directly to your plants’ roots
- Understand how drip irrigation can save you time and promote healthy plant growth
- Get the knowledge you need to create a custom irrigation system for your garden
Understanding the Benefits of Drip Irrigation
Let’s dive into the world of drip irrigation and explore its numerous benefits for gardeners. Drip irrigation is a method that has revolutionized the way we water our plants, making it a more efficient and effective process.
What Is Drip Irrigation and How Does It Work?
Drip irrigation is a type of irrigation system that delivers water directly to the roots of plants, drop by drop. This method reduces water loss due to evaporation and runoff, ensuring that your plants receive enough water without wasting a single drop.
The system consists of tubes or pipes with emitters or drippers that release water at a controlled rate. This slow and steady delivery allows the soil to absorb the water more effectively, promoting healthy root growth.
Advantages Over Traditional Watering Methods
So, why should you consider switching to drip irrigation? Here are some compelling reasons:
- Drip irrigation prevents overwatering by delivering water directly to the roots, reducing the risk of leaf diseases.
- You’ll save time since your system can be automated, freeing you up to enjoy your garden.
- Drip irrigation dramatically reduces weed growth because you’re only watering your plants, not the spaces between them.
- Your plants will thank you with better growth and higher yields since they’re getting exactly enough water.
- You can easily add fertilizer to your drip system for even healthier plants.
By adopting drip irrigation, you’ll not only improve your garden’s health but also contribute to water conservation. It’s a win-win for gardeners and the environment!
Planning Your DIY Drip Irrigation System
Creating a DIY drip irrigation system that’s tailored to your garden’s needs requires some upfront planning. Let’s break it down into manageable steps to make your gardening life easier!
Assessing Your Garden’s Watering Needs
Start by evaluating your garden’s watering requirements. Consider the types of plants you have, their watering needs, and the soil type. This assessment will help you determine the right components for your drip irrigation system.
Mapping Out Your Irrigation Grid
Next, map out your irrigation grid. Visualize where you’ll place your tubing, emitters, and other components. This step ensures you have a clear plan before you start digging. Think of it as creating a blueprint for your DIY irrigation project!
Creating a Materials Shopping List
Now, let’s get organized with a shopping list that’ll make your trip to the garden center a breeze! You’ll need to gather the basic components: 1/2-inch mainline tubing, 1/4-inch feeder lines, emitters, connectors, end caps, and a timer. Consider starting with a drip irrigation kit if this is your first system – they include most of the basics and take the guesswork out of compatibility.
- Don’t forget a pressure regulator – most home water pressure is too high for drip systems and can damage your components.
- A backflow preventer is essential to keep your drinking water safe (and it’s required by code in many areas).
- Grab some landscape staples or stakes to secure your tubing and prevent it from moving around or being damaged by lawn equipment.

Essential Components for DIY Drip Irrigation Systems
When it comes to building your DIY drip irrigation system, having the right components is crucial for efficient watering. Let’s explore the essential parts you’ll need to get started.
Tubing Options and Sizes
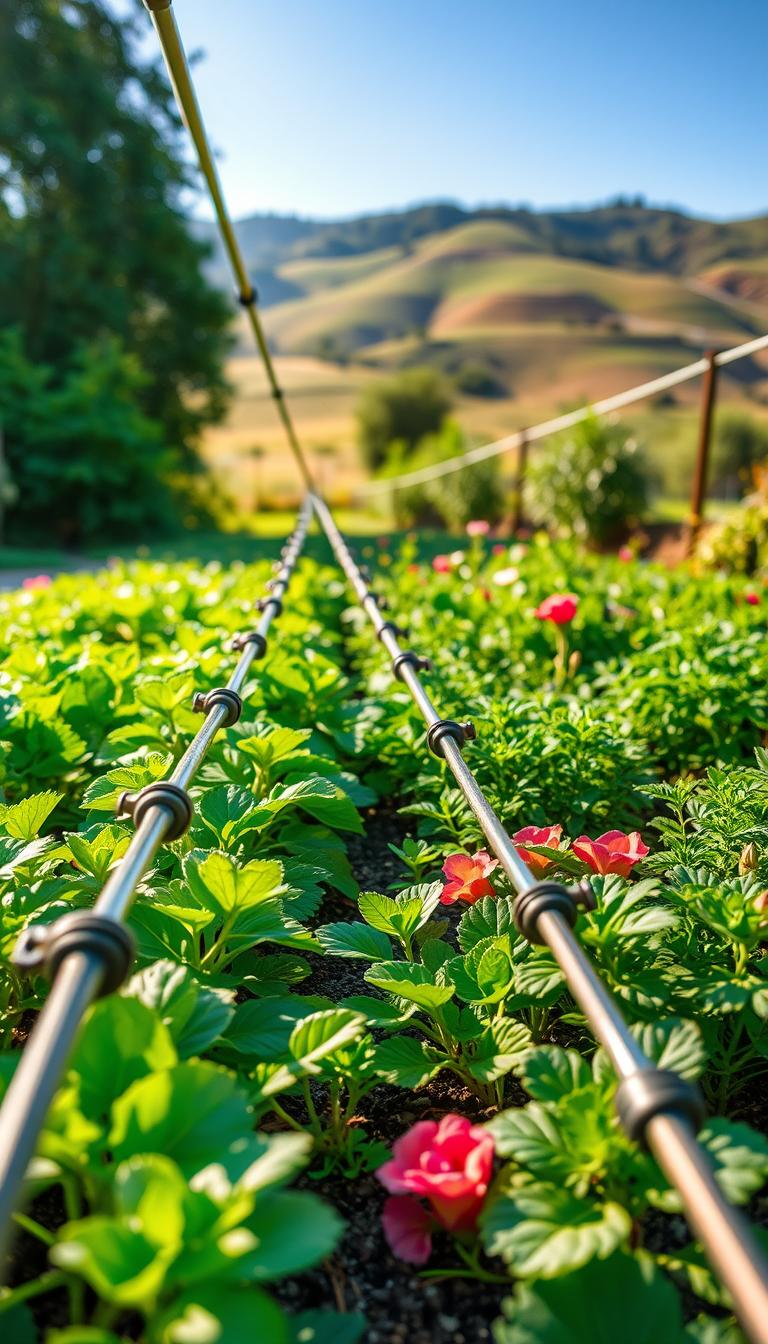
The mainline of your drip irrigation system is the tubing that carries water from your source to the rest of the system. You’ll typically use 1/2 inch or 1/4 inch tubing, depending on the size of your garden and the water pressure. Choose the right size to ensure optimal water flow.
Emitters, Drippers and Sprinkler Heads
Emitters and drippers are where the water is released into the soil. You can choose from various types, including pressure-compensating emitters that deliver water at a consistent rate, regardless of pressure fluctuations. Consider the specific watering needs of your plants when selecting emitters.
Connectors, Valves and Backflow Preventers
The unsung heroes of your drip system are the connectors and valves that keep everything flowing smoothly! You’ll need tees, elbows, and couplings to join your tubing pieces together. A backflow preventer is also essential to prevent contaminated water from flowing back into your household water supply. Don’t forget to install a pressure regulator to reduce your home’s water pressure to the recommended 25-30 PSI for drip systems.
By understanding these essential components, you’ll be well on your way to creating a efficient and effective DIY drip irrigation system that will make your gardening tasks easier and more enjoyable.
Step-by-Step Installation Guide
Now that we’ve planned our DIY drip irrigation system, it’s time to get our hands dirty with the installation process! This step-by-step guide will walk you through connecting to your water source, laying out the main line, and installing branch lines with tees.
Connecting to Your Water Source
The first step in installing our drip irrigation system is connecting it to our water source. This is a crucial step as it ensures our system has the water it needs to function properly. To do this, we’ll need to attach our main line to the water source using a suitable connector. Make sure it’s secure to prevent leaks!
Tip: Use a timer or a valve to control the water flow, making it easier to manage your irrigation schedule.
Laying Out the Main Line
With our system connected to the water source, it’s time to lay out the main line. This involves uncoiling our tubing and placing it along the path where we want our irrigation system to run. It’s essential to keep the main line as straight as possible to minimize kinking and ensure smooth water flow.
- Uncoil the tubing carefully to avoid kinks.
- Place the main line along the desired path, securing it with stakes or clips if necessary.
Installing Branch Lines with Tees
It’s time to create the network of branch lines that’ll deliver water throughout our garden – this is where our system really starts taking shape! First, identify all the spots along our main line where we’ll need branch lines to reach different planting areas. These are where we’ll insert tee connectors.
- Cut our main line with sharp pruners and insert the tee by pushing firmly until the tubing seats completely.
- Dip the ends of the tubing in warm water first to soften the plastic and make connections easier.
- Secure each connection with a band clamp if using compression fittings, or simply push firmly if using barbed fittings.
- Cut lengths of 1/2-inch tubing for our branch lines, making them long enough to reach the furthest plants in each section.
- Work methodically from one end of our garden to the other, completing each branch line before moving to the next.
- Before moving on, turn on our water briefly to check for leaks at all our tee connections.
By following these steps, we’ll have a robust drip irrigation system that efficiently waters our garden, reducing waste and ensuring our plants receive the right amount of moisture.
Setting Up Emitters and Feeder Lines
Now that we’ve laid out the main lines, it’s time to focus on setting up emitters and feeder lines for our drip irrigation system. This step is crucial for ensuring that water reaches all our plants efficiently.
Proper Emitter Placement for Different Plants
When it comes to emitter placement, different plants have different needs. For instance, plants like tomatoes and squash require more water, so we’ll place emitters closer to them. On the other hand, drought-resistant plants like succulents need less water, so emitters can be placed farther away. It’s all about understanding the specific watering needs of our plants to create an effective drip irrigation system.
Installing Feeder Lines to Reach Distant Plants
Feeder lines are essential for delivering water to plants that are farther away from the main line. We’ll use smaller tubing for these feeder lines, connecting them to the main line using tees or connectors. It’s important to secure these feeder lines properly to prevent damage or kinking, which could restrict water flow.
Capping and Securing Your System
Once we’ve installed all the emitters and feeder lines, it’s time to cap off the ends of the individual lines with caps and secure them with band clamps. Before we do this permanently, we need to flush the system by removing the end caps and turning on the water, allowing it to run until it flows clear. This step removes any debris from installation. After flushing, we’ll install the end caps, pushing them firmly onto the tubing until they’re fully seated.
To secure our tubing, we’ll use landscape staples every 2-3 feet along straight runs and at every change of direction. Special attention should be given to areas where tubing might be stepped on or run over by lawn equipment. Covering our main lines with a light layer of mulch not only protects them from UV damage but also makes them less visible, giving our garden a neater appearance.
Automating Your Drip Irrigation System
Automating your drip irrigation system is a game-changer for maintaining a lush garden with minimal effort. By integrating a timer or smart controller, you can ensure your plants receive the right amount of water at the right time, even when you’re not around.
Choosing the Right Timer for Your Needs
When selecting a timer for your drip irrigation system, consider the size of your garden and the complexity of your watering needs. A basic timer might suffice for small gardens, while larger or more complex systems may require a smart irrigation controller. Look for a timer that can handle the water pressure of your system and has enough stations to cover all areas.
Programming Watering Schedules
Once you’ve chosen your timer, programming your watering schedules is the next step. Determine how often you want to water and at what time of day. For most drip irrigation systems, watering deeply but less frequently encourages deep root growth. Adjust your schedule as needed based on weather conditions and the time it takes for your system to deliver 1 inch of water to the soil.
Smart Irrigation Controllers and Apps
Smart irrigation controllers take your drip irrigation system to the next level by connecting to your home’s WiFi network. This allows you to control your system from your smartphone or tablet. Many smart controllers can automatically adjust watering times based on local weather data and some even offer soil moisture sensing capabilities. The accompanying apps provide valuable data like water usage history, helping you track conservation efforts.
With the ability to control your drip irrigation system remotely and receive insights into your watering habits, you’ll be able to optimize your system’s performance. Whether you’re looking to save time, water, or both, automating your drip irrigation system is a step in the right direction.
Maintenance and Troubleshooting
Let’s dive into the essential maintenance tasks for your drip irrigation system to ensure it continues to serve your garden well.
Regular System Checks and Cleaning
Regular checks are crucial to the longevity of your drip irrigation system. To keep it in top shape, flush the system every four to six months by removing the end caps and turning on the water supply, allowing it to run until the water flows clear. This simple step helps remove any debris that might clog your system.

Fixing Common Problems
Despite its efficiency, your drip irrigation system might encounter issues. Common problems include clogged emitters or leaks. To fix these, start by inspecting your system for any visible damage or blockages. Cleaning clogged emitters with vinegar can often resolve the issue, and repairing leaks is usually a matter of replacing the damaged section.
Winterizing Your System
If you live in an area where temperatures drop below freezing, winterizing your drip irrigation system is essential. Start by turning off the water supply and disconnecting your timer and other components. Then, open all end caps and drain valves to let the water drain out. For added protection, consider using an air compressor to blow out any remaining water from the lines, taking care not to exceed 30 PSI to avoid damaging your system.
By following these maintenance steps, you’ll ensure your drip irrigation system remains in great condition, ready to support your garden through the next growing season.
Conclusion
With the knowledge you’ve gained, you’re now ready to transform your gardening experience with a DIY drip irrigation system that’s tailored to your needs. By installing such a system, you’re not just making your gardening life easier – you’re also conserving water, improving plant health, and reducing weed growth. Remember, your system can be as simple or as complex as your garden needs, so start small if you’re feeling overwhelmed, and expand as you gain confidence.
The beauty of DIY drip irrigation is that it’s endlessly customizable. You can always add zones, extend lines, or adjust emitters as your garden grows and changes. So gather your supplies, make your plan, and dive into this rewarding project – your future self (and your plants) will be so grateful you did!